The proper temper for a particular tool depends upon the way it will be used: woodcarving tools are usually tempered straw or light straw for hardness. They must stay sharp for long periods of time, and the shank of the tool is not subjected to great amounts of stress during normal use.
Stone-carving tools need to be hard at the cutting edge or teeth, but the shank also needs to be tough and not brittle because of the hard pounding it is subjected to. The tooth end of the chisel should be tempered to a full straw, with the shank tempered blue or softer.
The chisel should be heated evenly by passing it over the flame, back and forth, on all sides. The teeth or cutting edge should be kept out of the direct flame - because the steel is thin in these areas it can rapidly overheat. When the sanded or polished areas of the tool begin to change color, letting the color creep up to the teeth slowly. When the end with the teeth is straw, move the flame towards the opposite end.
Continue to heat the thicker shank until blue, and hold it at that color for a couple of minutes. Be careful that the tooth end does not change any further, and allow the tool to air cool slowly. If the tool is quenched too quickly, the tempering may not go all the way through the tool — you do not want to leave the tool core hard and brittle with the case tempered softer! Ideally, the core should be softer, but tougher, than the hardened case of the tool, with only the cutting edge tempered hard all the way through.
If all went properly, the teeth and about half an inch of the tip of the chisel are hard enough that a file will skate over the surface, while the rest of the chisel shank is soft enough to be nicked with the file.
HONING
After tempering of woodcarving or edge tools, the final cutting edge should be sharpened and honed to shape. Care must be taken not to overheat the edge. Grind slowly and cool the tool by quenching often if a grindstone or powertools are used. A good Rule-of-Thumb is to cool the tool if it gets uncomfortable to hold with your bare hands, i.e., — no gloves during this stage of the work.
With proper care, the edge of the woodcarving tool should last through dozens of sharpenings. With toothed stone-carving chisels, the points can only be sharpened about three or four times before the teeth are worn down so that they cease to be functional. Then it is time to once again get the torch out and start the process over again.
USING THE PROPANE TORCH
The common propane torch will heat the cutting end of a half-inch diameter tool to bright cherry red if the tool is held in the hottest part of the flame. The flame consists of two parts: the smaller intense blue area near the torch tip; and the larger, paler and more diffuse area surrounding the inner flame. The hottest part of the flame is just beyond the tip of the inner intense blue flame. The tool should be held in this part of the flame, and rotated so as to heat both sides evenly.
SHAPING THE TOOL
In making a tool from an old file or other piece of tool steel, it might be necessary to do some re-shaping, or forging, while the steel is hot. For hot-forging, the metal should be heated to orange/yellow heat (1700° to 1900°F), which requires either a forced-air blower on a forge, or an oxy-acetylene torch.
However, the shaping techniques discussed here can be done while the metal is cold.
After annealing, when the tool has cooled to room temperature, it will be soft enough so that it can be cut with a hacksaw, and it can easily be filed to shape. Grinders can also be used, but be careful not to 'burn' the edges by overheating to red heat.
The woodcarver's chisels and gouges, as well as the stonecarver's points and flats need re-shaping occasionally. However, the stonecarver's toothed chisel is the most prone to damage and needs re-shaping most often. Because it is the most difficult to re-shape, the tooth chisel procedure can serve as an example of the basic process.
The most common problem for toothed chisels is broken teeth. If one of the end teeth has broken almost completely off, then you might want to cut the corresponding tooth off the opposite side. To re-shape a chisel with only a partially broken tooth, you will first need to grind all the teeth down to a level with the stump of the broken tooth. Be patient and quench often - use a water quench while grinding so as to prevent 'burning' the steel.
At this point there may not be much left of the divisions between the teeth, so a hacksaw is used to cut slots about ¼" deep into the center of those divisions. Then the three-sided or triangular file is used at an angle (45° to center axis of shank) to follow the slot left by the saw on both sides of the cutting edge. After making an equal number of file-strokes in each slot on both sides, the teeth should resemble equal-sized pyramids with sharp points. The two outside teeth will need to have their outside faces filed to match. If a highly finished surface is desired, the appropriate time to refine and smooth the surfaces is prior to the hardening process.
However, if the tool is a woodcarving tool, do not grind the final edge. Instead, leave about a sixteenth of an inch thickness remaining. The edge would be too easily overheated and the steel 'burned' if finished now. The delicate final edge will be honed to shape after the tempering stage.
HARDENING
After all shaping is complete the tool is ready to be hardened. Heat the tip of the tool (about the last inch with the cutting edge) with the torch directed slightly down the shank from the teeth. The teeth, or the thin cutting edge of the chisel will heat faster than the shank, and the flame must be directed away to avoid overheating. When the whole tip of the chisel is light cherry red, quench the entire tool.
The liquid used to quench can be water, brine, or oil at about 70° to 90°F. Water cools the steel quickly, resulting in a harder steel throughout. Water is fine for tools that are fairly massive, such as most stone-carving tools.
Brine (solution of rock-salt in water so as to allow an egg to float) cools the metal more quickly than plain water alone. Quenching in brine results in a hard shell encasing a slightly-softer but tougher core. The smaller sizes and finer-toothed stone-carving tools would be better quenched in brine or oil.
Oil will cool more slowly, and is recommended for thin-bladed or delicate tools such as woodcarving tools or punches.
The quenching bath and container should be of large enough size to fully accommodate the tools and allow for several inches of movement within the bath. For quenching 8" long chisels a 2-gallon metal bucket would be the minimum requirement, larger if a number of chisels are to be quenched successively. For chisels a figure-eight movement will insure that the steel is cooled evenly on all sides of the tool - stirring with a circular motion will cool one side of the tool faster than the other and so result in stresses, warping, or cracking of the steel.
After the tool has cooled to the touch and the surface remains wet when removed from the quenching bath, it should be as hard as a file. As is, this is too brittle to use for a striking tool, so tempering is required.
CUSTOMIZING OR MAKING YOUR OWN TOOLS
Through use and sharpening, the carver's high-carbon steel chisels lose their efficiency, and they must either be periodically discarded or re-fashioned. A blacksmith shop can do the re-fashioning, re-grinding and re-shaping, or the carver who is using the tools can do it for him or herself. The techniques discussed here require a minimal outlay for tools and equipment. The basic tools are a torch, a grinder, a hacksaw and files. While some carvers might want to also forge their own tools, that would be beyond the scope of this writing (but see the reading list at bottom of page).
STEEL FOR TOOLS
All steel is not alike — a carving tool made out the steel in a bolt would not work very well because the edge would be soft and dull very rapidly. Most common carving tools are made from a type of steel, which has a high amount of carbon in the alloy. The molecular structure of the carbon in the alloy causes the properties of the steel to change at different temperatures, thus allowing it to be hardened to varying degrees. Inexpensive sources for high-carbon tool steel would be old files, star drills, springs, and old lawnmower or saw blades.
Tools purchased ready-made as carving tools will be manufactured out of high-carbon tool steel, although the quality of the steel can vary depending on the manufacturer. Generally, carving tools made by respected companies from the US, England, Germany, Italy, and Japan will be made from good quality steel. Inexpensive tools made anywhere, but particularly from Taiwan, China, and India, might use inferior grades of steel. When using scrap to make tools, test it first. Mild steel will look the same in all the procedures, but it will not actually harden for working.
A simple test to see whether or not the steel is regular mild steel or high-carbon tool steel is to compare the sparks thrown off during grinding. A common steel nail will throw off a spray of sparks that are straight and fairly short streaks of fire. The spray thrown off by a piece of high-carbon steel, by comparison, will be brighter and have short, secondary streaks shooting-off at all angles from the far end of the main streaks. The following basic procedures will only work with tools made out of high-carbon steel.
Whether you are custom modifying or re-grinding broken high-carbon steel tools, there are certain basic procedures to follow:
1. ANNEALING or NORMALIZING - to soften the steel
2. SHAPING - by cutting, grinding, or filing
3. HARDENING - hardening the steel
4. TEMPERING - to reduce the brittleness of the hardened steel
5. HONING - the final sharpening of the edge
Class: Carving in Wood and Stone all materials copyright 2019 Don Dougan
Don Douganwww.dondougan.com
FURTHER READING ABOUT MAKING YOUR OWN TOOLS
Weygers, Alexander G. THE MAKING OF TOOLS, (New York: Van Nostrand Rheinhold Company), 1973.
The author was trained first as an engineer/blacksmith, and later became a sculptor/engraver. He approaches the making of the tools from that viewpoint. Very thorough, including setting up a small forge and illustrated step-by-step instructions for about fifteen various types of tools for wood and stone carving, for metalworking, and for the kitchen and the garden. He has also authored a book about blacksmithing: THE MODERN BLACKSMITH.
Larsen, Ray. TOOL MAKING FOR WOODWORKERS, (Bethel, CT: Cambium Press), 1997.
Blacksmithing for the woodworker — the book covers tool steels, forging equipment and techniques, safety, finishing, heat treating, and design considerations. Step-by-step instructions for a skew chisel, a hollowing adze, turner's hook tool, and a mortising chisel. Illustrated with B&W photos. Though the book is intended for woodworkers, the basic information in the book also applies to stone-carving tools.
Bertorelli, Paul (editor). FINE WOODWORKING: ON HAND TOOLS, (Newtown, Connecticut: Taunton Press), 1986.
Reprints of 38 articles about different aspects of hand tools which appeared in FINE WOODWORKING magazine between 1975 and 1986. Topics include basic blacksmithing, heat treating, toolsteel, Alexander Weygers, chisels, using & restoring antique tools, and fashioning a set of carving gouges. Other topics are the making, sharpening and use of a wide variety of handtools: spoon bits, auger bits, doweling jigs, files & rasps, wood threading, scrapers, sharpening and making several types of saws, layout tools, tiny tools, axe handles, spokeshaves, and drawknives. Again, though the book is intended for woodworkers much of the information would be of interest to someone making stone-carving tools.
Petrovitch, Joe. CUSTOM TOOLS FOR WOODWORKERS: DESIGNING & MAKING YOUR OWN, (Harrisburg, Pennsylvania: Stackpole Books), 1990.
The author is a woodworker and he approaches the making of the tools from the woodworker's viewpoint. However, the basic information in the book would also apply to stone-carving tools. Very thorough, including setting up a small forge and illustrated step-by-step instructions for about seven types of woodworking tools.
ANNEALING or NORMALIZING
Annealing is the first step in re-grinding or making a tool. It serves to render the steel malleable and reduce the relative hardness so that it can be worked easily with hacksaws and files. The tool must be heated either in a forge or with a torch. Small inexpensive propane torches will work for tools with a shank diameter of ½" or less, but for larger tools a hotter, oxy-acetylene torch flame will be necessary. An oxy-acetylene torch will also speed the work on smaller tools.
If you are making a tool out of an old file or some other piece of high-carbon tool steel, you will need to heat the entire tool. If you are going to be re-grinding an old or dulled chisel, then you only will need to heat 1½" to 2" of the cutting-edge end of the chisel. The shank and the striking end of the chisel should already have an existing temper.
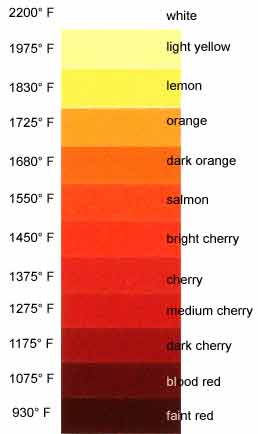
If you are re-grinding an old chisel, hold it with the cutting edge up as you heat it with the torch – remember, heat rises. Direct the torch flame to the area below the cutting edge, just the last inch or so. As the steel heats it will first turn a dull gray, and then a faint or dark red (900°-1050°F), blood red (1050°-1075°F), then dark cherry red (1075°-1250°F), medium cherry red (1250°-1375°F), cherry red (1375°-1550°F), light or bright cherry red (1450°-1550°F), and then salmon (1550°F), dark orange (1650°F), orange (1725°F), lemon (1830°F), light yellow (1975°F), and finally white (2200°F), at which point the steel begins to burn. The chart at left is for determining the relative colors — the colors of the steel need to be observed in a semi-dark room or shadowed area. The orange-yellow range is used for forging, but for the purposes of annealing and hardening, the cherry red range is as hot as you need to get the steel.
To anneal the steel the color has to reach bright cherry red. Then the steel needs to slowly cool to room temperature. By placing the tool in a bed of ashes you insure a slow, even cooling rate - which in turn insures an even molecular structure for the steel and allows it to be easily worked into shape.
TEMPERING
Tempering will make the tool tougher and less brittle, but at the sacrifice of some of the hardness. Tempering by hand-and-eye can be done selectively, allowing the cutting edge of the tool to remain relatively hard and long-lasting, while making the shank tougher in order to take the punishment of hammer blows. This is done by heating the selected parts of the tool to fairly specific different temperatures. The exact temperature the hardened steel is brought to changes the molecular structure of the steel slightly — the hotter the steel, the tougher and less brittle it becomes.
After hardening, the surface will appear a uniform dull gray. To properly judge when the correct tempering temperature is reached, the surface of the steel should be sanded bright. Sand the surface of the tool tip for about 2" or so on both sides. The smoother the surface the easier it will be to see the changes in color during tempering. For stone-carving tools, sanding with 100-150 grit will be sufficient, and sanding to 600 grit is acceptable and even desirable on woodcarving tools. The surface should not be polished with buffing compounds prior to tempering unless all the residues of the compounds are scrubbed completely away afterwards with hot soapy water or solvents. Keep fingerprints off the surface - they will distort the tempering colors.
Although the forge is ideal, either an oxy-acetylene torch or a propane torch will work for tempering by hand-and-eye. The object is to heat the tool slowly and evenly to the desired temperature, giving you the most control. The tool needs to be heated gradually — not directly in the hot flame which can quickly make the surface much hotter than the core of the tool.
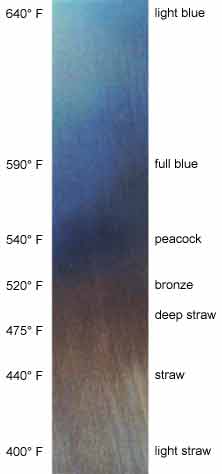
The colors oxidizing on the surface of the steel serve to indicate what temperature the surface of the steel has reached. If the tool has been heated slowly and evenly, the core of the tool will be close to the same temperature as the surface. The relative colors are shown at left.
The order of the temper colors by appearance are: pale or light straw(400°F), straw or full straw(440°F), deep or dark straw(475°F), bronze or brown(520°F), peacock (540°F), blue(590°F), light blue(640°F), and finally gray.
links to the rest of Don's site:
NOTE: none of these pages below links back to the current page, use your browser's BACK button to return here.